Who’s your best picker? Who’s thinned the most trees?

Who’s your worst picker? Who’s thinned the most trees?

Did you know you have visibility to your team’s productivity on the ABCgrower App? Always up-to-date, see the quantities being achieved and who your best and poorest performers are.  Use this information to make on-the-spot decisions.  

Available for any piece rate activity where Intra-Day times are collected – harvest, thinning, pruning and more!  

How to see Live Productivity on the ABCgrower App

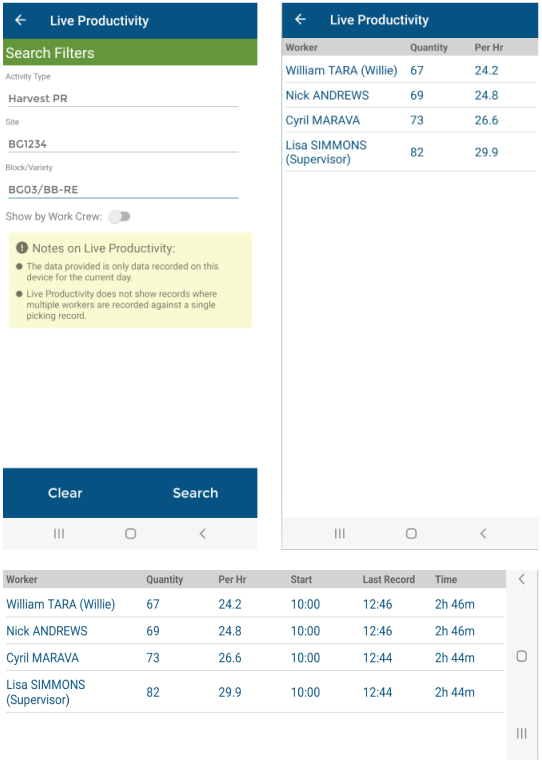
  1. Tap Live Productivity on the main menu.
  2. Tap Activity Type and choose from the list. You will be able to select any piece rate activity for which records have been entered today.
  3. You can filter by Site and Block/Variety if you wish.
  4. Tap Search to view by Worker.  You will see the workers, their quantity and quantity per hour.
  5. Rotate into landscape mode to also see start time, last record time and total activity time.
  6. You can tap any column header to sort by that column. Tap again to reverse the sort order.
  7. You can also see the results by Work Crew. Turn on Show by Work Crew toggle before tapping Search.
  8. With the device in portrait mode the results show the work crew, number of workers, and quantity per hour.  Rotate into landscape mode to also see total activity time.
  • The results show the information recorded on your device. To see information from other devices as well, go to Live Productivity on ABCgrower Web.

Live Productivity on ABCgrower Web

You can also view Live Productivity on ABCgrower Web.  The search filters and reporting is the same as for ABCgrower App, however the results are a combination of information uploaded from all devices as well as information entered directly into ABCgrower Web.  Live Productivity is found under the Reports menu.

The existing Productivity report remains available.  Use this report to search a particular date range and for additional options.

Mistakes in Intra-Day Records?

Missing records?

I explained a while back about how information collected on the ABCgrower mobile App is passed through staging tables when it is uploaded to the website.  The records are checked for errors before they are passed to the relevant data tables.  If any records are in error the uploaded batch is held in the staging table.  Examples include double scanning of a unique bin number and scanning a worker who has been marked inactive. 

What’s new?


We’ve moved the staging tables out of the various menus into their own Mobile App menu.  The staging tables you can see depends on the modules your organisation uses and your user permissions.

The red notification icon shows when there are records being held in error, with the number on the notification telling you how many records there are.

What do I do with them?

Records are automatically processed every few minutes.  It’s possible for records to be in the staging tables but not in error if they’ve just been uploaded but not yet processed.  In this case you can click [Re-process] to push them through if you like.

If there are records in error there will be a message to tell you what’s wrong.  You can delete a record by clicking the adjacent rubbish bin icon.  Then you can click [Re-process] to push any remaining records through (or wait for them to auto-process).  Remember to re-enter the corrected record via the the appropriate page (e.g. Activity > Worker Activity) if necessary.

24-hour Time

3pm or 1500 hours?

You can now choose a 12-hour or 24-hour time format on the ABCgrower App.

App Setting

The 12-hour format is set by default.  Enable the 24-hour format in the App Settings – this is a one-off step.

Tap the cog icon on the right of the blue main Menu banner. 

Turn on the Enter 24 hour time toggle.

Entering worker time on an Android device

The 24-clock shows two dials for setting the hours.  Tap the desired time on the clock face, or drag the hand around the inner or outer dial to the desired time.  

Alternatively, tap the keyboard icon and enter a time using the keyboard.

The images show the 24-hour format with hours selection on the left and minutes selection on the right.

Entering worker time on an Apple device

Use the dial picker.  The 12-hour format has hours one  to 12 and an am and pm option, the 24-hour format has hours one to 24.

Intra-Day App Toggles

Do you record intra-day times? Do your piece workers move between blocks one by one, rather than as a crew?

Then this maybe a tool for you… Introducing the Finish Intra-Day and Start Intra-Day toggles.  Use these to auto-create intra-day times when entering a picking record on the ABCgrower App.

Start of Day

Record an Intra-Day Start Time for your worker’s first Activity for the day via Worker Time in the usual way.

Finish Intra-Day

When a worker has done their final pick in a block, enter this via Enter Pick Data in the usual way, and turn on the Finish Intra-Day toggle. This will use the timestamp of the picking record to set the end time for that worker.

The fine print:  The Activity Type and Block/Variety of the Picking record and original Intra-Day Start time must match, or the toggle will be disabled.

Next Block

The worker moves into the next block and starts picking.  When their first pick in entered via Enter Pick Data in the usual way, turn on the Start Intra-Day toggle.

This uses the end time of the previous block as the start time of the new block for that worker.

Tips

It is not essential the toggle is engaged on the first picking record of the new block as it will remain available for a subsequent picking record, and still record the correct time.  This is because it uses the end time of the previous intra-day record to set the new intra-day start time.

Once the toggle is engaged it will become unavailable while the worker remains in that block.  This is a handy check if you’re unsure whether you’ve engaged the toggle for a Worker already.

The image below shows the information entered in the example above when uploaded to ABCgrower Web.  This is a partial record for a day and the timesheet will auto-update as further records are uploaded.

App Settings

Enable this functionality in the App Settings – this is a one-off step.

Tap the cog icon on the right of the blue main Menu banner. 

Tap Picking Settings and turn on the Finish Work Time toggle and/or Start Work Time toggle.

Part Bins

Got part filled bins at the end of the day?

It is particularly important with the recent changes to the Australian Horticulture Award that quantities are accurately recorded and there maybe times where you need to record a partially filled container. This enables you to pay your piece workers accurately – for their sake, and yours.

For example, a worker has picked a quarter of a bin and it’s knock off time. The bin is left in the field and will be filled up tomorrow. If you don’t record this you risk an unnecessary minimum wage top up as the worker’s productivity is falsely lowered. And they need to be paid for the work done.

The problem is having to know tomorrow what was recorded today – was it a quarter, 0.2, a third? We have a solution….

App setting

Enable this functionality in the App Settings – this is a one-off step.

Tap the cog icon on the right of the blue main Menu banner.

Tap Picking Settings and turn on the

 toggle.

Today

Enter Pick Data and enter the Qty of the part filled container as a number between zero and one.

Upload Data as usual.

Tomorrow

Download Settings at the start of the day. This will load any part containers that were recorded up to three days ago on any device and have been previously uploaded to the website.

Scan the same container and the Qty will be auto-populated with the remaining amount. This way you do not need to know accurately what volume was recorded in the first instance. The worker(s) can be the same or different.

No Need To Double Up Your Data

Avoid doubling your data entry

If an Intra-Day Time exists for a worker, you can set the ABCgrower App to automatically load the parameters into a Work Activity record. 

App setting

Enable this functionality in the App Settings – this is a one-off step.

Tap the cog icon on the right of the blue main Menu banner.

Turn on the Default from Intra-Day toggle.

Worker Time

Enter an Intra-day Time for your Worker(s) – Tap Set Worker Time, select the Activity Type and Grower and any further details as required by your business process.

Activity Record

Tap Enter Pick Data or Enter Non Pick Data, select the Worker, and the details from their latest Intra-Day Time record will be automatically loaded into the Work Activity record. Too easy.

Entering End Times On ABCgrower App Made Easy

Setting breaks and end times…with ease

If you record Intra-Day Times you may have noticed that when you tap Worker Time you now get a sub-menu with Add and Break / End.

Tapping Add takes you to the usual Set Worker Time screen where you can enter Start Times, End Times and Breaks as usual. Read on, this is where it gets really good…

Tapping Break / End gives you a list of all Workers with a Start Time for the day. This means you don’t have to scan or search for the workers again to enter their Break and/or End Time!

Tap the All checkbox, and/or tap individual names on the list, and then tap Update.

Break / End

If you are wanting to enter Unpaid Break Time only for the selected workers enter it here.

You can record Unpaid Breaks when entering Start Times or End Times, or leave a gap between activities, but it’s often best practice to record the break against the activity at the time of the break, and this functionality supports this.

Tap Enter End Time to enter the End Time, and optionally breaks, for the selected workers.

New tool for selecting crew members

When you want to choose more than one worker from a list on the ABCgrower App, you used to long press one of the names to enable multi-select. This has changed. Now you tap the list icon top right of the blue banner, and then you can tap the All checkbox, and/or tap individual names on the list.

Where to find staging tables and your data

Missing records?

I explained a while back about how information collected on the ABCgrower mobile App is passed through staging tables when it is uploaded to the website.  The records are checked for errors before they are passed to the relevant data tables.  If any records are in error the uploaded batch is held in the staging table.  Examples include double scanning of a unique bin number and scanning a worker who has been marked inactive. 

What’s new?


We’ve moved the staging tables out of the various menus into their own Mobile App menu.  The staging tables you can see depends on the modules your organisation uses and your user permissions.

The red notification icon shows when there are records being held in error, with the number on the notification telling you how many records there are.

What do I do with them?

Records are automatically processed every few minutes.  It’s possible for records to be in the staging tables but not in error if they’ve just been uploaded but not yet processed.  In this case you can click [Re-process] to push them through if you like.

If there are records in error there will be a message to tell you what’s wrong.  You can delete a record by clicking the adjacent rubbish bin icon.  Then you can click [Re-process] to push any remaining records through (or wait for them to auto-process).  Remember to re-enter the corrected record via the the appropriate page (e.g. Activity > Worker Activity) if necessary.

How to control the default ‘work date from’ date – updated!

Dating Tips – Part 2

Work Date From’ is a common filter in ABCgrower, like in Worker Activity Search for example.  It’s set to 3 months by default, but you have control over this.

Sound familiar? I talked about this a while back. Well, now it’s a whole lot better.  Not only can you set a default for your organisation, you can set different defaults for individual users.  For example, a manager who frequently runs daily reports may set the number of months to zero, and a spray operator who looks at the seasons data may set the number of months to three.

Set user default

Go to Settings > Users > click the User name link and select a value from the dropdown list in Work Date Default.  To set the default to the current date choose zero.  To keep using the default value set for the organisation leave the field blank.

Set organisation default

Go to Settings > Control and change the setting in Work Date Default.  To set the default to the current date select zero.  This will apply to any users without a value set on their user profile. 

How to set pay rates in bulk

Work smarter, not harder

Paying your workers by the hour?  Any worker who is to be paid by the hour must have an Hourly Rate or Pay Grade set against their individual record.  Sounds painful? It doesn’t have to be. You can set Pay Rates and apply Pay Grades in bulk.  It really is as easy as ABC.

Tell me how?

If you’re using Pay Grades make sure these are setup first via Settings > Pay Grade.

Go to Worker > Worker, use the filters and Search for the workers (you can filter the list further in the next step).  Then click Create Pay Rate.

Enter the Effective From Date and the Hourly rate, or if using Pay Grades, tick the box and then select the Pay Grade from the dropdown list.

Select the workers you want the rate or grade to apply to and lastly, hit Create!